Code for IBM i | Part 7: Creating and Executing a Translation Program Using the DeepL API
By Makoto Ogawa, T&Trust K.K.
Finally, let’s create and run a program with VSCode that uses the DeepL API discussed in another feature in this issue of the magazine, “Introduction to APIs for IBM i Users.
Preparation
Item: Contents
Program name: DEEPLAPI
Name of Created Library: IMAG2023
Source Code File Name: deeplapi.sqlrpgle
Storage: Local (development PC)
User Profile: IMAG23WINT
User Class: *SECOFR
Special Permissions: *USRCLS
Execution environment: PASE
This time, the program is not run on the 5250 emulator but in the PASE environment to display the results. To connect to the PASE environment via ssh and display the results on the same screen, it is necessary to use the printf function in the C/C++ runtime library (Stsnfsrf output; output stdout).
Let’s first change the shell used to connect via ssh to bash. Bash shell allows you to use the cursor keys to move the cursor, delete keys, etc., just like at the Windows DOS prompt.
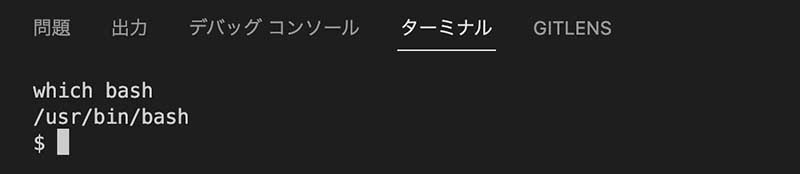
To change the default shell to bash, you need to know where bash is located. There is a which command to check the full path of a file in a PASE environment, so let’s use this to check the full path of bash.
Connect to the PASE terminal (click on Terminals on the status bar and select PASE) and execute the which command (Figure 67).
Then, using IBM i notebooks, change the default shell for the user to connect to, specifying the full path identified in which. The procedure used is the QSYS2.SET_PASE _SHELL_INFO procedure, which is changed using the SQL CALL statement (Figure 68).

To check if the change has been made, search with SQL for the USER_INFO view (https://www.ibm.com/docs/ja/i/7.3?topic=services-user-info-view), which contains information about the user profile.
If the column PASE_SHELL_PATH is set to the full path of the specified bash, the set is complete (Figure 69).

After confirming that bash is set as the shell for the PASE environment, click the trash can icon in the upper right corner of the terminal screen to close the screen, disconnect from the IBM i and reconnect (Figure 70).

Then click Terminals on the taskbar and select PASE to display the terminal. If it appears as shown in Figure 71, it is OK (4.4 is a version, so that it may vary depending on your environment).

Coding
Now let’s code the program. First, the initial settings (creation of a folder to save the code, Deploy destination settings, and creation of .vscode/actions.json in the folder) should be completed regarding the maintenance of the local source code.
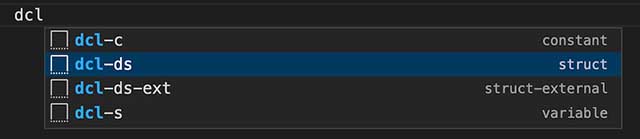
Open the folder created by VSCode and create the file deeplapi.sqlrpgle. When entering sample code, a code assist function is available for some, but not all. If a candidate appears that you want to enter, try selecting it.
For example, if you want to enter a data structure and enter “dcl,” the candidates will appear as shown in Figure 72.
If you select dcl-ds, the code will be inserted as shown in Figure 73.
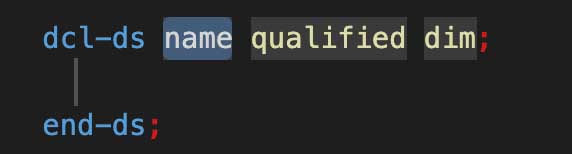
The cursor is set at “name,” and you can enter the name of the data structure you want to enter.
If you do not find the one you want to input, press the space key to clear the candidates and continue typing. Note that if you press the Enter key while the candidates are displayed, you have selected the topmost candidate.
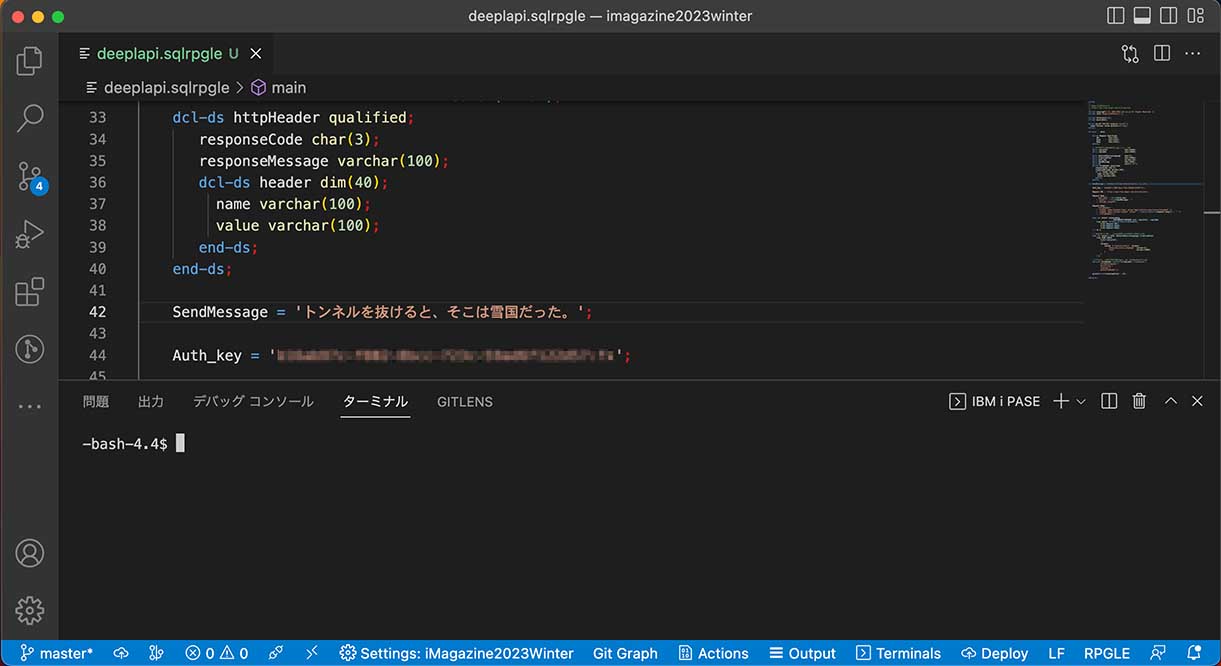
The following is the full code for a program that calls the DeepL API, which was introduced in another feature in i Magazine 2023 Winter, “An Introduction to APIs Dedicated to IBM i Users.
In the sample coding, the Japanese language set in the SendMessage variable is passed to the DeepL API, and the result of the English translation is received and Output to stdout by printf. In addition, the Japanese for the conversion source is set to “トンネルを抜けると雪国だった(in Japanese)” is set.
Press Ctrl + s to save the file when all the code has been entered.
Compile
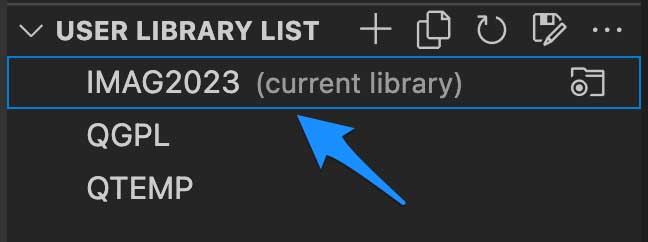
When you have finished entering the code, let’s compile it. First, the library where the object is created should be set IMAG2023 in the USER LIBRARY LIST, since the current library is an abbreviation (Figure 74).
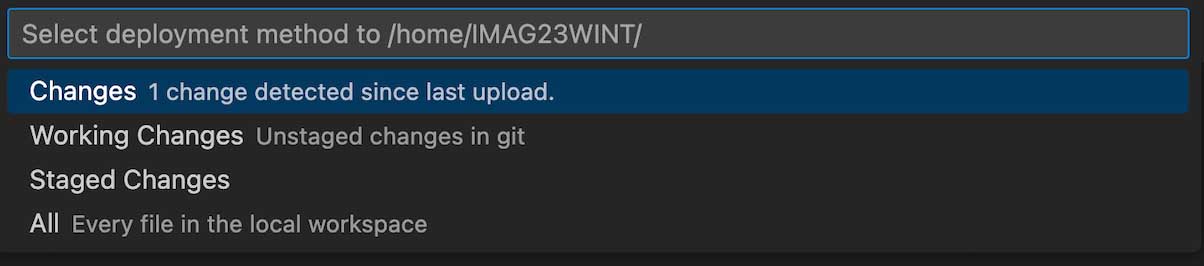
Ctrl + E will display candidate commands at the top and select the action Create SQLRPGLE Program. Next, the IFS directory where the source code is to be Deployed and the selection of the file to be pushed are displayed at the top. Since we will only push the newly created deeplapi.sqlrpgle, we select Changes 1 change detected since last upload (Figure 75).
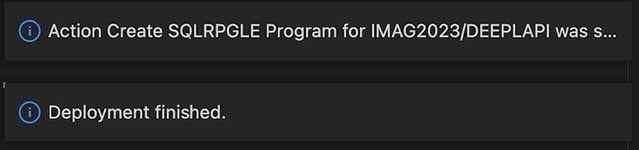
Then, the message Deploy completed displayed in the lower right corner of the screen, followed by the execution result of the action Create SQLRPGLE Program (CRTSQLRPGI command) (Figure 76).
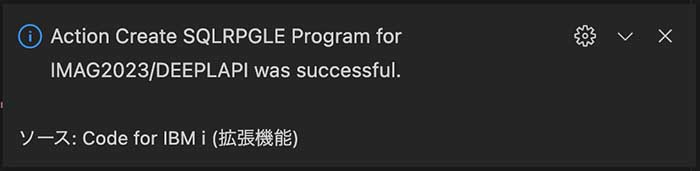
The details of the execution result of the action can be checked by clicking on the expansion symbol for the notification that appears when the cursor is placed over the message (Figure 77, Figure 78).

If compilation fails, click Output on the status bar to display the compilation list, check the error location, modify the source code, and execute the compilation action, repeating until there are no more errors.
Execution
Once the program has been created, let’s execute it. First, click Terminals on the status bar and select PASE (Figure 79).
To execute the program from the PASE environment, specify the system command followed by the IBM i CALL command (Figure 80).
system “call imag2023/deeplapi” Figure 80

The DeepL API translated “トンネルを抜けると雪国だった(in Japanese)” as follows.
When I went through the tunnel, I found myself in a snowy country.
Summary
We hope you understand that the Code for IBM i extension to Visual Studio Code can be used as an alternative to the SEU/PDM environment and that source code’s version control, including RPG III, can be performed in Git. We also hope you have been able to visualize that the CL and RPGLE extensions can be used as a code completion function for coding CL and RPG programs at a very high level.
Furthermore, IBM i Notebooks allows the following operations within a single file in VSCode (without the need to display the execution of SQL scripts on the 5250 screen or ACS).
・Execution of CL commands
・Execution of SQL statements
・Execution of Shell Script
・Write documents in Markdown in a notebook
Above all, it is worth mentioning that this notebook is also managed by Git, which enables information and execution commands to be shared in team development.
The first commit of Code for IBM i to GitHub was on February 21, 2021, and as of January 9, 2023, the total number of commits is 1626 (2.36 commits/day by simple calculation). There are approximately 35 committers. The latest version is 1.6.8, which has been tagged 177 times; in December 2022 (one month), there were 69 commits; there are 44 open issues on GitHub, and the tool is evolving daily.
In the verification process for writing this paper, there were some cases where Code for IBM i did not work as expected. For example, when compiling local code, the compile list is displayed. Still, the list of error items only is not displayed (Note: The problem of displaying the list of error items only has been resolved since this report was written). However, since the tool is under such active development, we expect the problems to improve rapidly.
Development tools for other platforms are freely selectable, whether proprietary or open source. IBM i, on the other hand, has had only proprietary tools as a choice, which has been a problem for many years. I thank Mr.Liam Barry Allan for bringing Code for IBM i to the world.
While RDi is still the best choice in terms of functionality, VSCode + Code for IBM i is also fully available. I hope this article will help you take the next step in your development environment.