Code for IBM i | Part 2: Basic Usage
By Makoto Ogawa, T&Trust K.K.
Let’s look at the basics of using Code for IBM i. This article appeared in the special feature “Introduction to Visual Studio Code for IBM i Users” of i Magazine 2022 Winter (published January 2022), but I will explain the basic points again.
Execution Environment
First, the IBM i environment used to write this article is as follows. Depending on the environment, it may not be the same as the article content, so please keep that in mind. The installation of the necessary licenses and PTFs and the execution of each command must be performed by users with the appropriate authority and following company regulations.
・Version: IBM i 7.3
・Cumulative PTF: C9116730
・Technology Refresh: 6
・SF99703 (DB2 for IBM i): 32
・5770WDS-SI62605
・QCCSID: 5035
Prerequisites (IBM i)
About sshd
Since Code for IBM i uses ssh for connection to IBM i, sshd must be started beforehand on the IBM i side.
Command: STRTCPSVR SERVER(*SSHD)
When sshd is started, the job QP0ZSPWP begins in the QUSRWRK subsystem. sshd should be started or not by the existence of this job.
Next, prepare the user profile required for the connection. sshd defaults to a user name of 8 characters or less. Otherwise, the connection will be refused. If you want the user name to be 9 or 10 characters long but still allow the user to connect (existing users are longer than 8 characters), use the
command: ADDENVVAR ENVVVAR (PASE_USRGRP_LIMITED) VALUE(‘N’) LEVEL(*SYS)
or execute the command: /QOpenSys/QIBM/UserDa
or in /QOpenSys/QIBM/UserDa
ibmpaseforienv PASE_USRGRP_LIMITED=N
in ibmpaseforienv PASE_USRGRP_LIMITED=N and restart sshd.
Since IBM i 7.4 and later support user names longer than 8 characters by default, the above settings are unnecessary.
There are two types of ssh connections: password authentication and public key authentication. In this case, password authentication will be used.
User Information
The following user and libraries will be used in this magazine issue.
・User profile: IMAG23WINT (USRCLS=*SECOFR)
・Library: IMAG2023
A user-specific directory should also be created as a destination to push the source code on the development PC. Create the directory /home/ and specify the path to that directory or *USRPRF in the user profile HOMEDIR.
The following command is executed after signing on as the IMAG23WINT user.
mkdir ‘/home/IMAG23WINT’
CHGPRF HOMEDIR(*USRPRF)
Prerequisites (Development PC)
Install VSCode beforehand (https://code.visualstudio.com/download). After installation, when VSCode is started, all menus will be in English. Still, a message will appear in the lower right corner urging you to install a Japanese language pack, which can be installed here (it can also be installed later as an extension).
Next, install Code for IBM i. VSCode for IBM i is displayed by clicking the extension icon on the Code activity bar, typing IBM in the input area labeled “Search for extensions in Marketplace,” and then click Install (Figure 12).
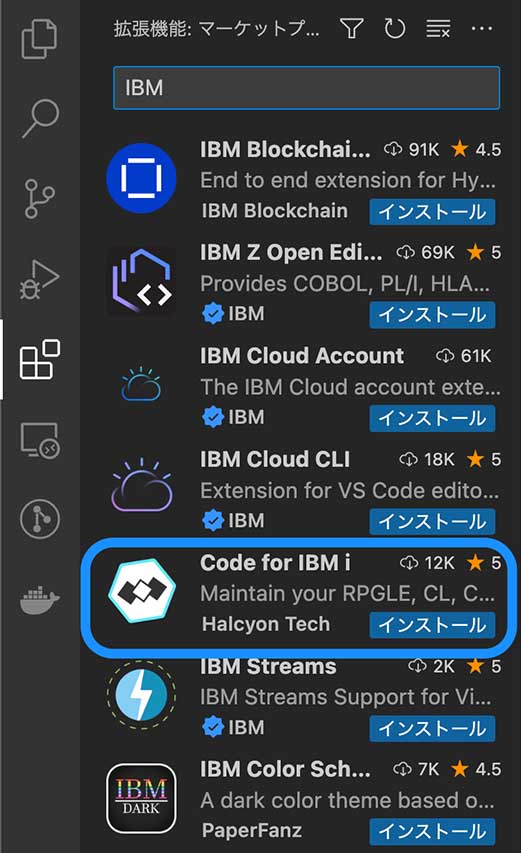
When Code for IBM i is installed, Code for IBM i Walkthroughs and IBM i Language extensions are also installed together.
The releases of the extensions used in this study are as follows.
・Code for IBM i: v1.6.8
・Code for IBM i Walkthroughs: v0.2.4
・IBM i Languages: v0.6.8
Connection Settings
Next, let’s create the connection settings: After installing Code for IBM i, you will see an IBM i icon on the activity bar(Figure 13. This icon will be used frequently in the future).

Then, click “Connect to an IBM i” on the sidebar and enter the following Information on the settings screen that appears (Figure 14).
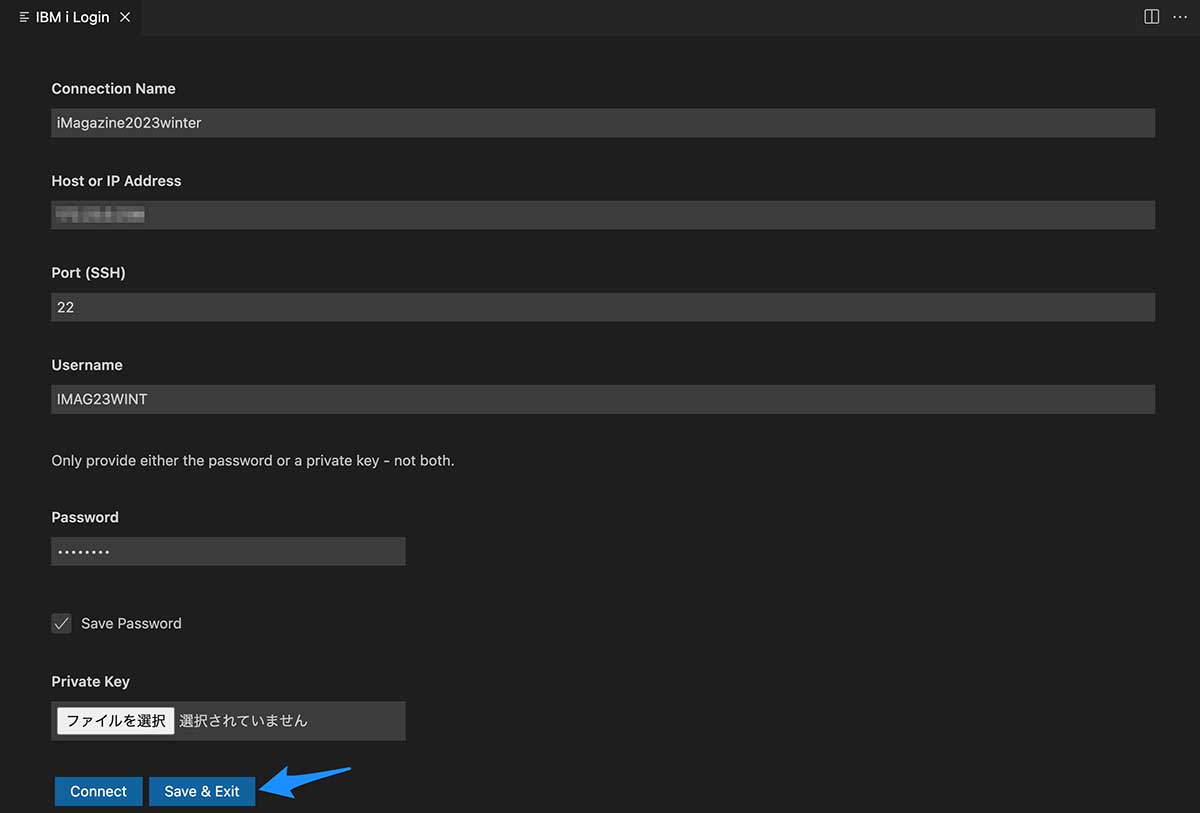
◎Item Settings: Contents
・Connection Name: Any name
・Host or IP Address: Hostname or IP address of IBM i to be connected.
・Port (SSH): IBM i sshd port number (abbreviated value: 22)
・Username: User profile used to connect to IBM i
・Password: Set for password authentication.
・Private Key: Specify a private key if the public is unauthenticated.
After entering the Information, click “Save & Exit” to save the connection setting Information. The connection settings created will appear in the sidebar, and clicking on it will connect to IBM i. If Save Password is not checked in the settings, you will be asked to enter a password at this point.
After the connection is complete, the following four sections will appear in the sidebar.
1. HELP AND SUPPORT
2. USER LIBRARY LIST
3. OBJECT BROWSER
4. IFS BROWSER
The status bar also displays Code for IBM i-related items (Figure 15).

◎Displayed items: Description
・Settings: Displays a screen for setting up additional connections.
・Actions: Set actions for remote sources and objects.
・Output: Displays the compile list, etc.
・Terminals: Connect to the PASE environment
This is basically all that is required to use Code for IBM i. However, some additional things must be confirmed and configured beforehand, so let us briefly explain them.
In Settings
Two items of note among the items displayed by clicking Settings on the status bar are
・Temporary library
・Clear temporary data automatically
First, Temporary library is a library on IBM i used temporarily by Code for IBM i and related extensions. The abbreviation is ILEDITOR, and it is assumed there is no library of the same name. If there is already a library of the same name in the respective environment, it is recommended to specify a dedicated library name.
The specified library will be automatically created upon connection if it does not exist.
If the abbreviated value is left as is, multiple users will share this library when using Code for IBM i. You must specify a unique name to have a temporary library for each user.
Note that “temporary library” refers only to temporary use by Code for IBM i, not the QTEMP library.
Next, “Clear temporary data automatically” specifies whether or not to automatically delete files and objects that are temporarily created in the temporary library. The target files for deletion are those beginning with O_, which are deleted on every connection.
Extension settings
Clicking on the administration icon at the bottom of the active bar, followed by Settings, creates a screen for managing the overall VSCode settings. Further, expand Extensions on the left and click Code for IBM i. The following two settings are worth noting here.
・Log Compile Output
・Show Connection Buttons
When Log Compile Output is enabled, the compile list can be referenced when the compile action is executed from VSCode. If an error occurs after compilation, it can be displayed by clicking Output in the pop-up window in the lower right corner. Likewise, you can refer to the latest list anytime by clicking Output in the status bar. The omitted value is enabled (checked), so leave this value as it is.
To disconnect a connection made with Code for IBM i, display the command palette (click on View-Command Palette) and select IBM i: Disconnect from the current connection. Buttons are enabled, and the Disconnect and Reconnect buttons will appear on the status bar. The default is disabled and should be enabled (Figure 16).
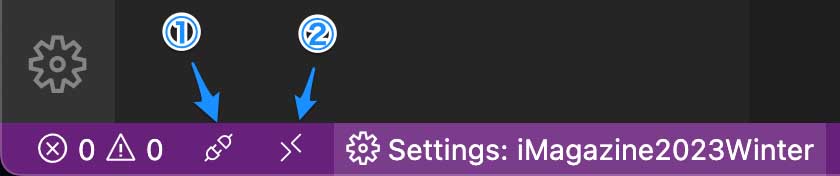
(1) Disconnect
(2) Reconnect
Viewing and Compiling Source Code
Let’s modify the source code on IBM i using Code for IBM i. First, create a filter to display source files with OBJECT BROWSER, displayed after connection. Next, set the filter to select all source files in the library IMAG2023 used in this case.
Click Create new filter and specify the following setting items to be displayed.
◎Item: Setting value
・Filter name: IMAG2023-SRC
・Library: IMAG2023
・Object: *(do not change)
・Object type filter: *SRCPF (do not change)
・Member:*(Do not change)
・Member type: *(do not change)
When you are done, click Save settings to save the settings. A filter named IMAG2023-SRC will then be created in OBJECT BROWSER.
Now let’s expand the filter and click to display the existing members (in this case, try01r.rpgle) (Figure 17).

What is displayed is an RPG IV program in fixed position format, an interactive program using the display unit file familiar to everyone.
Now, let’s compile this source code. When you press Ctrl+E while the cursor is on the source code, candidates of compilers to be executed according to the type of members are displayed at the top. This time, I selected Create Bound RPG Program (CRTBNDRPG).
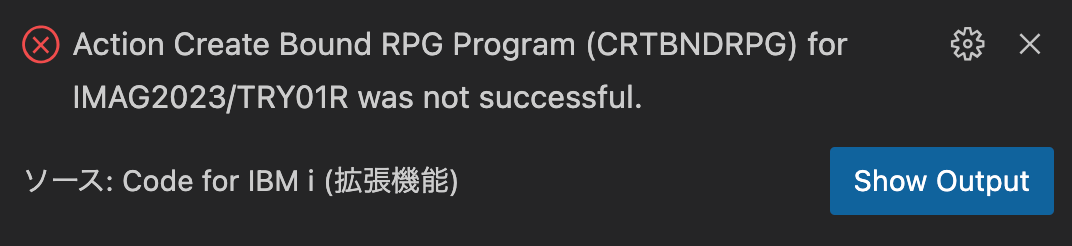
The execution result is displayed in the lower right corner. Although a message indicating that the action failed is displayed, the source code for this project was written so that a compile error occurs (Figure 18).
The compilation list is displayed by clicking the Show Output button (Figure 19).
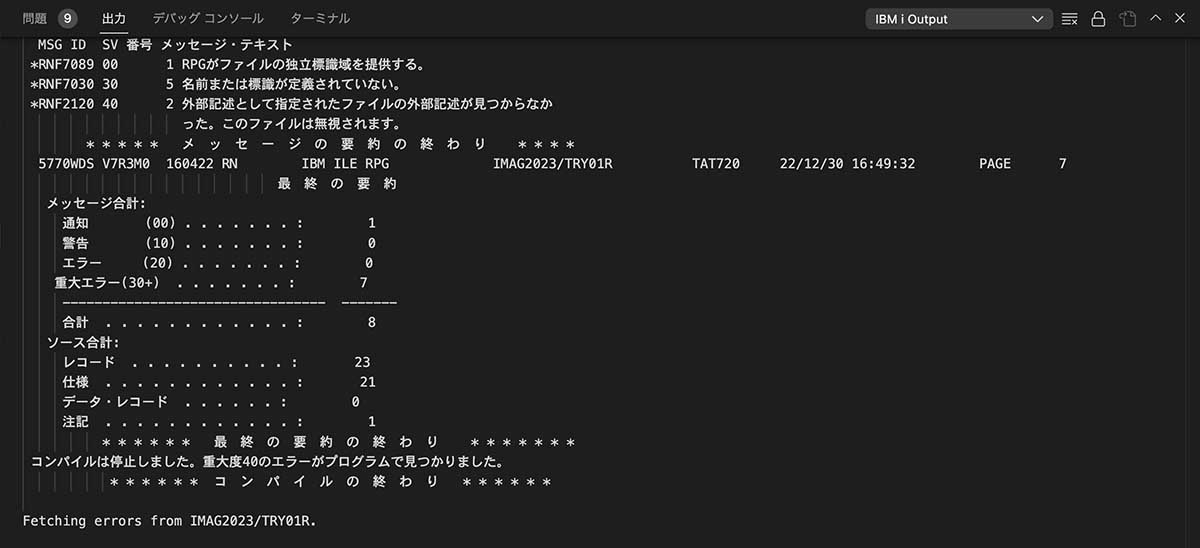
Usually, the user would have to execute the WRKSPLF or WRKJOB command to display the contents of the compilation list. Then, after identifying the error location, exit the compilation list display and re-execute SEU to correct the code. Code for IBM i allows you to refer to the compile list with the source code displayed at the top, making it much easier to identify and correct the error location.
In addition to locating the error in the compile list and searching the source code, you can also click on the problem in the upper left corner of the list screen. This is even more convenient because a list of errors is displayed by error severity, and clicking on the error moves the cursor to the corresponding part of the source code (Figure 20).
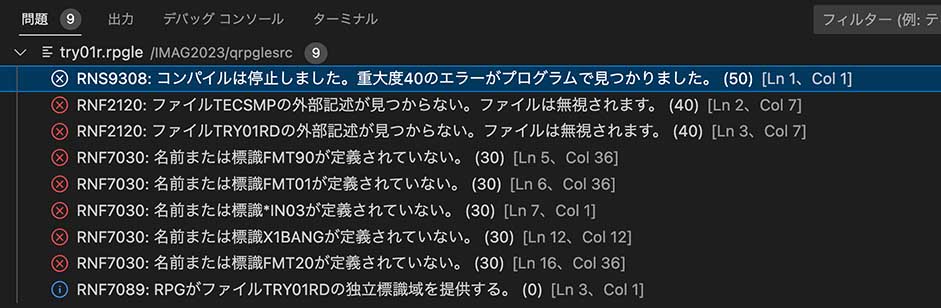
In this case, the error is “RNF2120 external description not found,” which indicates a problem with the compile-time library list settings. Since TECSMP and TRY01RD are in the IMAG2023 library, let’s set IMAG2023 as the current library in the USER LIBRARY LIST (Figure 21).
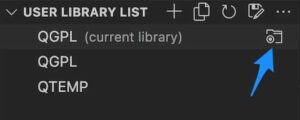
In this example, the current library is QGPL, so we set IMAG2023 to the current library by clicking the icon on the right side. Then execute the compile action again.
The RNF2120 error is resolved, but the RNF7030 error (the name FMT20 is not declared) causes another compile error (Figure 22).

Clicking on the line with RNF7030 moves the cursor to the line using FMT20. If the destination is the EXFMT line, the error is that FMT20 is not defined in the display unit file TRY01RD that is being used. Check by displaying try010rd.dspf in the QDDSSRC in the filter you just created (Figure 23).
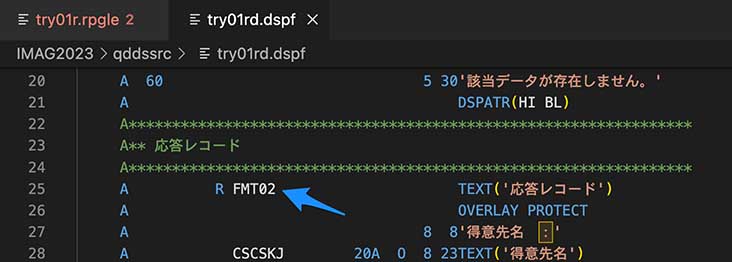
Then we found that it is FMT02, not FMT20, so we modify the source of TRY01R, save it, and run the compilation again.
This time, a message indicating that the compilation was successful is displayed in the lower right corner of the screen (Figure 24).

Compilation of RPG III program
Figure 25 shows the result of opening the RPG III member as well.
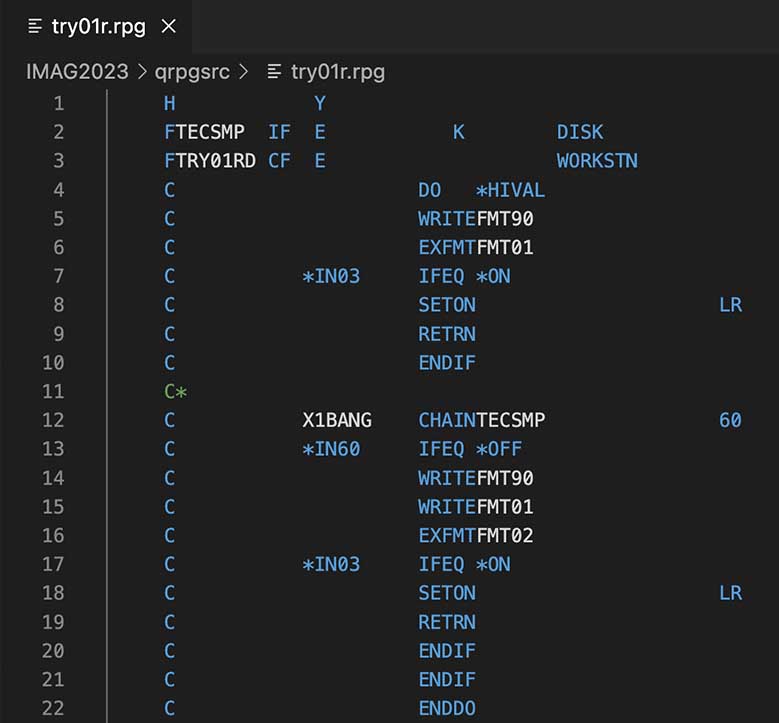
Since the program has the same logic as the previous program and FMT02 is correctly entered, it should be possible to compile the program as is, so press Ctrl+E.
Then, CRTRPGPGM is not found in the candidate compilation commands (Figure 26).

This is because Code for IBM i has yet to pre-register the compile command for RPG III programs. Of course, the necessary commands can be registered as new actions, which we will do.
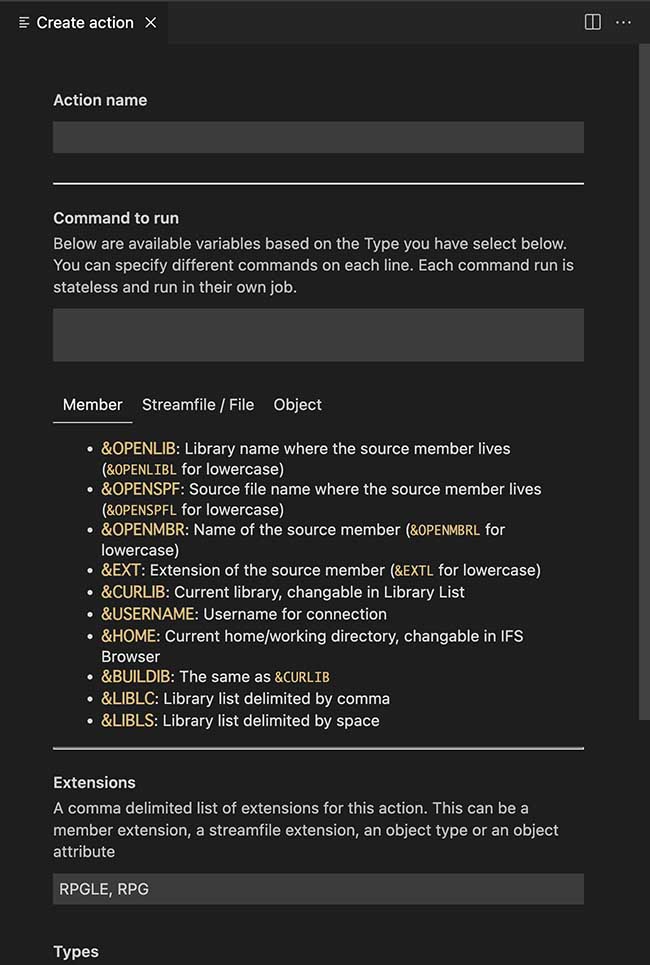
Clicking on Actions in the status bar displays a list of pre-registered commands selected by file extension. Clicking the New Action button at the bottom of the screen will display the screen shown in Figure 27.
◎Item: Set value
・Action Name: Name displayed as a candidate when Ctrl+E is pressed.
・Command to run: Command to be executed (written using the variable displayed)
・Extensions: RPG only
・Types: Members (to be enabled by actions on members)
・Environment: ILE as OPM cannot be selected.
The substitution variables that can be specified are as follows.
◎Substitution Variables: Description
・&OPENLIB: Library name of the corresponding source file (member)
・&OPENSPF: Name of the source file where the source member is registered.
・&OPENMBR: Name of the selected source member.
・&EXT: Extension of the source member chosen
・&CURLIB: Current library set in USER LIBRARY LIST
This time, “Create RPG III Program (CRTRPGPGM)” is specified in Action Name, and the following command is specified in Command to run.
CRTRPGPGM PGM(&OPENLIB/&OPENMBR)
SRCFILE(&OPENLIB/&OPENSPF) OPTION(*SRCDBG)
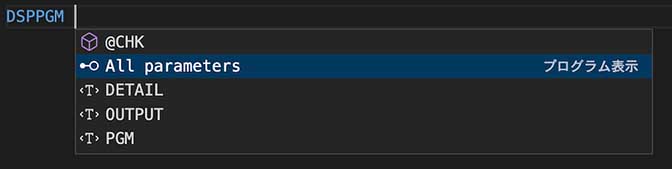
Select the source code again and press Ctrl+E. The added action should appear, and click on it (Figure 28).
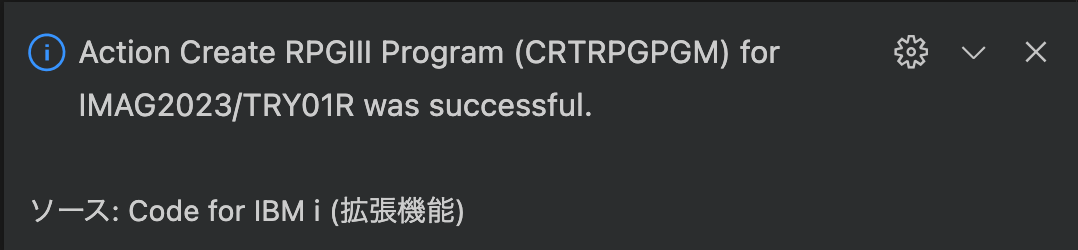
The compilation is executed, and a message is displayed that the program has been created (Figure 29).
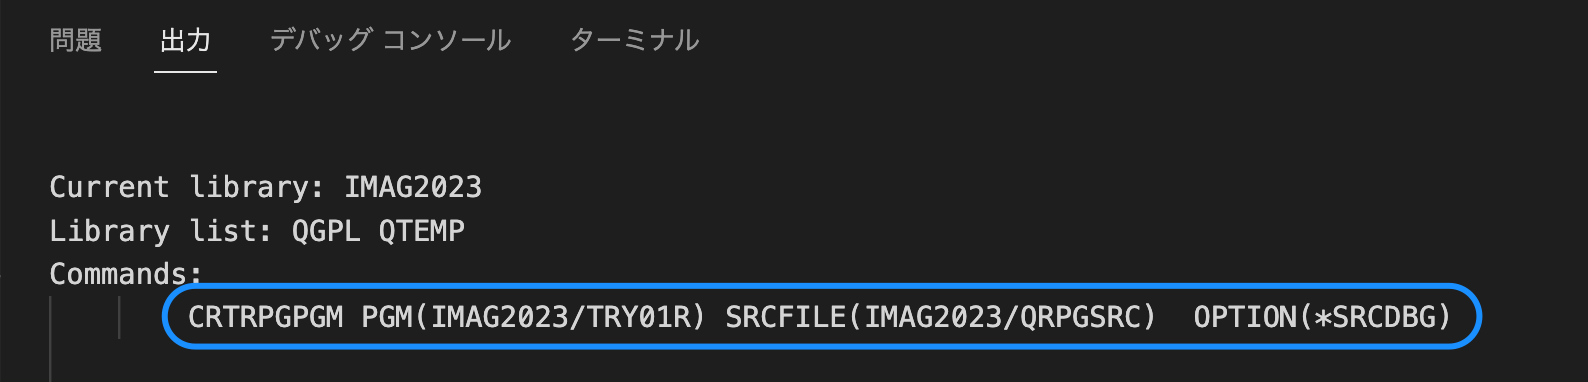
The compilation list is displayed by clicking on Output on the status bar and moving to the top section, and it can be seen that the CRTRPGM command is being executed (Figure 30).
This simple example has shown you that you can directly edit and compile source members on IBM i using Code for IBM i. Moreover, both RPG IV and RPG III use syntax highlighting to display source code in an easy-to-read manner, and although it depends on the PC’s resolution, the number of lines that can be shown is far greater than in SEU. You can see that Code for IBM i can be an alternative to SEU/PDM, except that it does not have the line-by-line prompting feature that SEU provides.